 Hi everyone!
Welcome to the August Blog & Video hop for the Creating Kindness Design Team!
I am so happy you are here today and taking part in our hop, our theme this month is Texture.
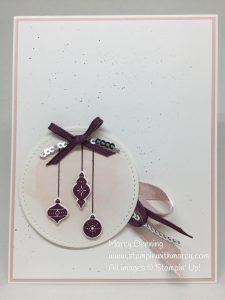
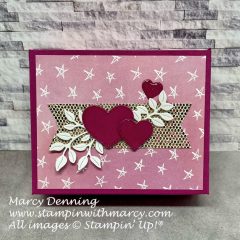
There are different ways to create texture on a card/project, I chose to add texture to my card by popping up my image with Stampin’ Dimensionals and adding ribbon. I do love my ribbon, so if I get a chance to add it to a project, you bet I will!!
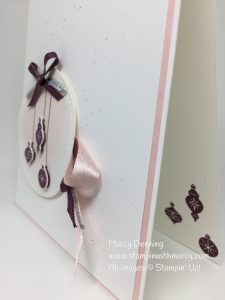
 Here is a side view so you can see how I tucked the ribbon under my popped up circle.
 Don’t forget to stamp the inside of your card as well; I sometimes forget to do this. It really does add so much to the inside of the card by doing this!
 I know you are thinking, “it’s a Christmas card, and it’s August!!”, I know for some of you this might be a tad early, not for me, I started creating Christmas cards in July.
This is the beautiful new Stampin’ Up! Bundle Carols of Christmas that is available for customers to purchase, yes, you can purchase it right now in my Online Store!!
This bundle was released early (in July) to us Demonstrators so we could get playing with it, the stamp set was also part of the promotion that Stampin’ Up! ran in July where you got it for free when you signed up as a Demonstrator during that month.
Here are the details on my card:
My base is Thick Whisper White, cut to 4-1/4″ x 8-1/2″ and scored at 5-1/2″
My next layer is Powder Pink and it is cut to 4-1/8″ x 5-3/8″
My top layer is Whisper White and is cut to 4″ x 5-1/4″
I used my Powder Pink and Fresh Fig markers along with my Clear Wink of Stella Glitter Brush to give the top layer a splatter look. This technique really adds to the front the card and breaks up the ‘white space’ without taking away from the image that is the focal point.
My circle Shimmery White and is die cut using the Stitched Shapes Framelits Dies. I used a colour wash on this with my Powder Pink ink pad and my Aqua Painter. The ornaments are stamped in Fresh Fig ink directly on the circle. I also stamped them on another piece of Whisper White cardstock and then die cut them out (yes, there is a matching die for the adorable little ornaments!!), and then popped them over top of the stamped images using the adorable new Mini Dimensionals. I attached my bow (1/8″Sheer Ribbon in Fresh Fig) and a strand of Silver Mini Sequins over top of the ornament strings.
I tucked some beautiful new Powder Pink 3/8″ Shimmer Ribbon, Fresh Fig 1/8″ Sheer Ribbon and some Silver Mini Sequin Trim under the popped up die cut circle.
I love my pretty pink Christmas card; I hope you do as well!!!
Remember, all the items I used to create today’s card can be purchased in my Online Store, simply click on the Shop Now button at the top of my page. Supporting me by purchasing through my Online Store helps keep me creating for you!
Here is the video I made creating today’s card.
I would love it if you watched it, gave it a Thumbs Up, commented on it, and subscribed to my YouTube Channel.
Thanks so much for visiting, I really appreciate it!
Hugs,
Marcy
Please follow along with our Blog Hop by clicking on the button below.
Product List


Product List


Jessie Holton says
I love this mix of colours! Lovely card! xx
Marcy says
Thanks Jessie xo
Jenny Hall says
Gorgeous ribbon, Marcy! Clean and beautiful card design. Well done!
Marcy says
Thanks Jenny xo
Cheryll Miller says
Gorgeous Christmas Card Marcie! xxx
Marcy says
Thanks Cheryll xo
Janneke says
Love your card Marcy ;O)
Janneke says
Love your card Marcy ;O)
Marcy says
Thanks Janneke xo
Satomi Wellard says
What a pretty card, Marcy! I love how you put ribbon and trim behind the die cut. It looks really pretty.
Marcy says
Thanks Satomi xo
Jay Soriano says
Love how you added interest on the background and the group of different ribbons to add texture is perfect for your card
Marcy says
Thank you so much Jay xo