
Hi Everyone!
Today I am here with the Scrapbook Sunday Team, and I am so happy to have you join us on our monthly Hop!
This month the theme is Winter, while my pages are not exactly winter themed, the photos were taken on February 3, 2018…so there is my winter connection!
These photos were part of my son and his fiancee’s engagement shoot last year. There were so many gorgeous photos that I had to do a 2 page layout!
I love all the elements to these 2 pages!
All of the products I used are from Stampin’ Up!, as a Stampin’ Up! demonstrator (in Canada) I only use their products, and when they have so many gorgeous coordinating products, there is no need to go anywhere else!!!
My ladies at my Memory Keeping Club loved these pages!
Here are the directions for creating my pages;
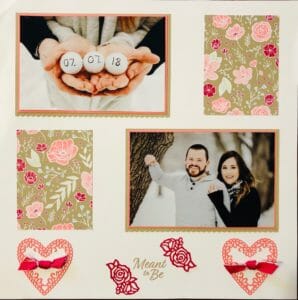
Meant To Be
Page 1 Supplies:
Paper: 12” x 12” Whisper White cardstock base, Crumb Cake cardstock (2 pieces cut to 6 1/8” x 4 1/8”) use the Stitched Scallop Border Framelit on the bottom edge of both of these. Flirty Flamingo cardstock (2 pieces cut to 5 15/16” x 3 15/16” to mat the photos, 2 scraps to die cut out Lace Heart Framelit, Lovely Lipstick cardstock scrap large enough to die cut out 2 Flower Dies, All My Love designer series paper (2 pieces cut to 4” x 3”)
Classic Stampin’ Pad – Crumb Cake
Tools & Adhesive: Big Shot die cutting machine, Magnetic Platform, Silicone Craft Mat, Meant to Be Bundle, Clear Block C, Lovely Lipstick Stitched Edge Ribbon, enough to tie 2 knots. Multipurpose Liquid Glue, Glue Dots, Paper Trimmer, Paper Snips, Big Shot Die Brush
Project Assembly
Start the project with all cardstock cut and ready and supplies at hand
Layer the photo mats in layers as follows; Crumb Cake cardstock with the stitched scalloped edge, followed by the Flirty Flamingo cardstock, then the photo. Adhere the first one to the top left corner of the 12” x 12” Whisper White cardstock base. Adhere the second one approximately ½” below the first and off to the right side. Adhere the designer series paper approximately 1 ¼” to the right side of the top photo mat and 1 ¼” to the left side of the bottom photo mat. Adhere the 2 die cut hearts to the bottom right and left of the page, adhere ribbon knots to the center of each heart. Stamp the Meant to Be sentiment to the center of the bottom of the page in Crumb Cake ink, adhere the two die cut flowers to either side of the sentiment
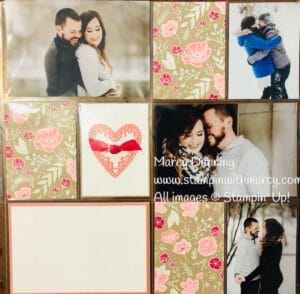
Page 2 Supplies:
Paper: Whisper White cardstock (1 piece cut to 5 11/16” x 3 11/16” and 1 piece cut to 3 7/8” x 2 ¾”) Crumb Cake cardstock (1 piece cut to 6” x 4”, and 1 piece cut to 4” x 3”), Flirty Flamingo cardstock (1 piece cut to 5 7/8” x 3 7/8”, 1 piece for die cutting out the Lace Heart Framelit), All My Love designer series paper (3 pieces cut to 4” x 3”), Variety Pack 12” x 12” Photo Pocket Page
Project Assembly
Adhere the journal box layers in the follow order, Crumb Cake cardstock, Flirty Flamingo Layer cardstock, and then the Whisper White cardstock layer, tuck this into a pocket. Adhere the Crumb Cake cardstock and Whisper White cardstock, adhere the die cut scalloped heart and ribbon knot and tuck into a pocket. Place designer series paper into desired pockets.
Thanks for stopping by today!
Hugs,
Marcy
Product List
 Designer Series Paper")


Jenny Hall says
Perfectly captured, Marcy! Your scrapbook pages never fail to bring smiles 🙂
Marcy says
Thanks Jenny xo
Cathy Caines says
Love these pages but mostly the story that goes with it. Its always the stories that matter the most. Beautiful!
Marcy says
Thanks Cathy xo
Colleen Johnson says
Beautiful Pages Marcy. I just love the new Heart Framelits
Marcy says
Thanks Colleen xo
Sharon Dalton says
I absolutely adore your sweet layout, and the use of the pocket pages…
I still am to succeed at creating with these guys I am more a traditional scrapbooker.
Cheers Shaz
Marcy says
Thanks Sharon xo